Taina
Taina
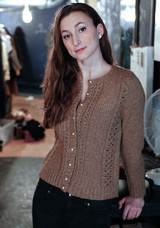
A trim, ladylike cardigan with just a hint of intriguing texture.
Shown in size Small
Sizes
Directions are for women’s size X-Small. Changes for sizes Small, Medium, Large, 1X and 2X are in parentheses
Finished Measurements
Bust (closed) – 32(36-40-44-48-52)”
Length – 23(23-24-24-25-25½)”
Materials
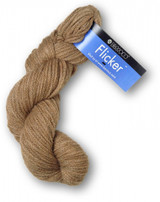
7(7-8-9-10-11) Hanks Berroco Flicker (50 grs), #3312 Odile
Straight knitting needles, size 8 (5.00 mm) and 10 (6.00 mm) OR SIZE TO OBTAIN GAUGE
3 St markers
Nine ½" buttons
Gauge
18 sts = 4”; 26 rows = 4” in St st on larger needles
TO SAVE TIME, TAKE TIME TO CHECK GAUGE
Stitch Glossary
P2tog-b
(Sl next st as if to k with yarn in back) twice, insert LH needle through both sts from the left and in front of the RH needle, remove RH needle, p the 2 sts tog from the back with RH needle
Honeybee Pattern (Starts with 16 sts)
Note: Due to the nature of this pat, the number of sts will vary from row to row. The number given at the end of each row indicates the number of sts you will have after completing that row.
Row 1 (RS): P2, k4, k2 tog, yo, SSK, k4, p2 – 15 sts.
Row 2: K2, p3, p2tog-b, drop yo of previous row, (yo) twice, p2 tog, p3, k2 – 14 sts.
Row 3: P2, k2, k2 tog, drop yo’s of previous row, (yo) 3 times, SSK, k2, p2 – 13 sts.
Row 4: K2, p1, p2tog-b, drop yo’s of previous row, (yo) 4 times, p2 tog, p1, k2 – 12 sts.
Row 5: P2, k2 tog, drop yo’s of previous row, cast on 4 sts onto RH needle, insert point of RH needle under the 4 loose strands and k these strands tog, yo, k the 4 loose strands tog again, cast on 4 sts onto RH needle, SSK, p2 – 17 sts.
Row 6: K2, p5, p2 tog, p6, k2 – 16 sts.
Rep these 6 rows for Honeybee Pat.
Raised Texture Stitch (Multiple of 4 sts)
Row 1 (RS): * P3 tog, leaving sts on LH needle, yo, p these 3 sts tog again, sl sts from needle, k1, rep from * across.
Row 2: Purl.
Row 3: * K1, p3 tog, leaving sts on LH needle, yo, p these 3 sts again, slipping sts from needle, rep from * across.
Row 4: Purl.
Rep these 4 rows for Raised Texture St
Little Shell (Starts with 9 sts)
Note: Due to the nature of this pat, the number of sts will vary from row to row. The number given after each row indicates the number of sts you will have after completing that row.
Row 1 (RS): P2, k1, (yo, k1) 4 times, p2 – 13 sts.
Row 2: K2, p1, (k1, p1) 4 times, k2.
Row 3: P2, k1, p1, SSK, k1, k2 tog, p1, k1, p2 – 11 sts.
Row 4: K2, p1, k1, p3 tog, k1, p1, k2 – 9 sts.
Rep these 4 rows for Little Shell
Back
With smaller needles, cast on 98(110-122-134-146-158) sts.
Ribbing: Row 1 (RS): K2, * p2, k2, rep from * across.
Row 2: P2, * k2, p2, rep from * across. Rep these 2 rows until piece measures 2” from beg, end on RS. Change to larger needles and p the next row, dec 26(28-32-34-38-40) sts across – 72(82-90-100-108-118) sts. Work even in St st until piece measures 5(5-5½-5½-6-6)” from beg, end on WS.
Dec Row (RS): K1, k2 tog, k to last 3 sts, SSK, k1 – 70(80-88-98-106-116) sts. Rep this dec every 3” once more – 68(78-86-96-104-114) sts. Work even until piece measures 10(10-10½-10½-11-11)” from beg, end on WS.
Inc Row (RS): K1, M1k, k to last st, M1k, k1 – 70(80-88-98-106-116) sts. Rep this inc every 3” once more – 72(82-90-100-108-118) sts. Work even until piece measures 14(14-14½-14 ½-15-15)” from beg, end on WS.
Shape Armholes: Bind off 4(5-6-7-8-9) sts at beg of the next 2 rows, then 2 sts at beg of the following 2 rows – 60(68-74-82-88-96) sts. Dec 1 st each side every RS row 5(7-8-10-10-12) times – 50(54-58-62-68-72) sts. Work even until armholes measure 8(8-8½-8½-9-9½)”, end on WS.
Shape Shoulders: Bind off 4(4-6-6-7-7) sts at beg of the next 2 rows, then 4(5-5-6-7-8) sts at beg of the next 4 rows. Bind off remaining 26 sts for back neck.
Left Front
With smaller needles, cast on 46(50-58-62-66-70) sts. Work in ribbing same as back for 2”, end on RS. Change to larger needles and p the next row, inc 4(4-1-1-2-2) sts across – 50(54-59-63-68-72) sts.
Establish Pat Sts: Row 1 (RS): K5(9-14-18-23-27), place marker, work Row 1 of Honeybee pat over 16 sts, place marker, work Row 1 of Raised Texture St over 20 sts, place marker, work Row 1 of Little Shell over 9 sts.
Row 2: Work Row 2 of Little Shell to first marker, work Row 2 of Raised Texture St to next marker, work Row 2 of Honeybee Pat to last marker, p to end. Work even in pat as established until piece measures 5(5-5½-5½-6-6)” from beg, end on WS.
Dec Row (RS): K1, k2 tog, work to end – 49-53-58-62-67-71) sts. Rep this dec every 3” once more – 48(52-57-61-66-70) sts. Work even until piece measures 10(10-10½-10½-11-11)” from beg, end on WS.
Inc Row (RS): K1, M1k, work to end – 49(53-58-62-67-71) sts. Rep this inc every 3” once more – 50(54-59-63-68-72) sts. Work even until piece measures 14(14-14½-14½-15-15)” from beg, end on WS.
Shape Armhole: Bind off 4(5-6-7-8-9) sts at beg of the next RS row, the 2 sts at beg of the following RS row – 44(47-51-54-58-61) sts. Dec 1 st at armhole edge every RS row 5(7-8-10-10-12) times – 39(40-43-44-48-49) sts. Work even until armhole measures 6(6-6½-6½-7-7½)”, end on RS.
Shape Neck: Next Row (WS): Bind off 6 sts, work to end – 33(34-37-38-42-43) sts. Bind off 3 sts at neck edge once, then dec 1 st at neck edge EVERY row 10 times – 20(21-24-25-29-30) sts. Note: Due to the difference in gauges, there will be a different number of sts on front shoulder than on back. They will, however, measure the same. When armhole measures 8(8-8½-8½-9-9)”, end on WS. Bind off 6(7-8-9-9-10) sts at armhole edge once, then 7(7-8-8-10-10) sts twice for shoulder.
Right Front
Work same as left front until piece measures 2” from beg, end on WS – 50(54-59-63-68-72) sts.
Establish Pat Sts: Row 1 (RS): Work Row 1 of Little Shell over 9 sts, place marker, work Row 1 of Raised Texture St over 20 sts, place marker, work Row 1 of Honeybee Pat over 16 sts, place marker, k to end.
Row 2: P to first marker, work Row 2 of Honeybee Pat to next marker, work Row 2 of Raised Texture St to last marker, work Row 2 of Little Shell to end. Complete to correspond to left front, reversing all shaping. Work side decs at end of RS rows as SSK, k1. Work side incs at end of RS rows as M1k, k1. Bind off for armhole on WS rows. Work armhole decs at end of RS rows. Bind off for neck on RS rows. Work neck decs at beg of RS rows. Bind off for shoulder on WS rows.
Sleeves
With smaller needles, cast on 58(58-62-62-66-66) sts. Work in ribbing same as back for 4”, end on RS. Change to larger needles and p the next row, dec 12(12-14-14-16-16) sts across – 46(46-48-48-50-50) sts. Work in St st, inc 1 st each side every 3¼(2-1¼-1¼-1-1)” 4(6-7-10-11-13) times – 54(58-62-68-72-76) sts. Work even until sleeve measures 18” from beg, end on WS.
Shape Cap: Bind off 4(5-6-7-8-9) sts at beg of the next 2 rows, then 2 sts at beg of the following 2 rows – 42(44-46-50-52-54) sts. Dec 1 st each side every 4th row 2(1-2-0-1-2) times, then every RS row 10(12-12-16-14-14) times, end on WS – 18(18-18-18-22-22) sts. Bind off 3 sts at beg of the next 2 rows. Bind off remaining 12(12-12-12-16-16) sts.
Finishing
Sew shoulder seams. Sew in sleeves. Sew side and sleeve seams.
Neckband: With RS facing, using smaller needles, beg at right front edge, pick up and k30 sts along right front neck edge, 28 sts across back neck edge, then 30 sts along left front neck edge – 88 sts. Knit 2 rows. Bind off knitwise on WS.
Left Frontband: With RS facing, using smaller needles, beg at top of left neckband, pick up and k126(126-130-130-134-138) sts along left front edge. Beg with Row 2, work in ribbing same as back for 1”, end on WS. Bind off in ribbing.
Right Frontband: Beg at lower right edge, work to correspond to left frontband until band measures ½", end on WS.
Buttonhole Row (RS): Work 2(2-4-4-2-4) sts, k2 tog, yo, * work 13(13-13-13-14-14) sts, k2 tog, yo, rep from * 7 times more, work to end. Complete to correspond to left frontband. Sew on buttons.
- Yarns Used:Berroco Flicker®
- Designer:Norah Gaughan
- Skill Level:Intermediate
- Craft:Knit
- Project Type:Women's Clothing


