


Magi


Magi
You don’t need to knit on DPNs or turn a heel to make 3 easy pancake stockings in the traditional Christmas shades of Comfort™
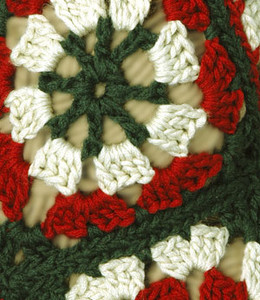
Magi A is an easy patchwork of crocheted granny squares with fold back cuffs and a tassle for trim.
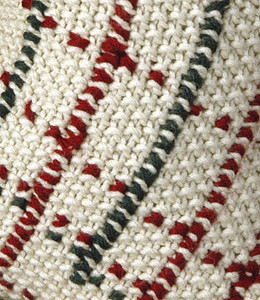
Magi B is knit in simple seed stitch and then embellished with cross stitch embroidery within the confines of the seed stitches. Finally the pieces are crocheted together and a twisted drawstring is drawn through the lattice top.
Magi C is knit in an easy aran pattern. The front and back are knit and then crocheted together and the opening is adorned with a generous crown of pompons.
Magi A
Skill level: Easy
Technique: Crochet
Size
Approximately 6” across x 18” high (with top folded down)
Materials
1 Ball each Berroco Comfort (50 grs), #9755 Wild Cherry (A), #9703 Barley (B) and #9762 Spruce (C)
Crochet hook, size 5.00 mm (H) OR SIZE TO OBTAIN GAUGE
Gauge
1 Motif = 4” square
TO SAVE TIME, TAKE TIME TO CHECK GAUGE
Motif 1 (Make 5)
With crochet hook, using C, ch 5, join with a sl st to form a ring.
Rnd 1: Ch 6 (counts as 1 dc and ch-3), (dc in ring, ch 3) 7 times, join with a sl st in 3rd ch of beg ch-6. Fasten off.
Rnd 2: Join B with a sl st in next ch, ch 3 (counts as 1 dc), 3 dc in same ch-3 space, ch 3, (3 dc in next ch-3 space, ch 3) 7 times, join with a sl st in 3rd ch of beg ch-3. Fasten off.
Rnd 3: Join A with a sl st in first of the last 3 ch’s worked, ch 3 (counts as 1 dc), 5 dc in same ch-3 space, ch 1, 6 dc in next ch-3 space, ch 3, (6 dc in next ch-3 space, ch 1, 6 dc in next ch-3 space, ch 3) 3 times, join with a sl st in 3rd ch of beg ch-3. Fasten off.
Rnd 4: Join C in next ch-1 space, ch 3, * 1 sc between 3rd and 4th dc’s of next group, ch 3, (2 dc, ch 3, 2 dc) in next ch-3 space, ch 3, sc between 3rd and 4th dc of next group, ch 3, 1 sc in next ch-1 space, rep from * around, omitting last sc at end of rnd, join with a sl st in 2nd ch of beg ch-3. Fasten off.
Motif 2 (Make 4)
Work same as Motif 1, using C for Rnd 1, A for Rnd 2, B for Rnd 3 and C for Rnd 4.
Motif 3 (Make 4)
Work same as Motif 1, using A for Rnd 1, B for Rnd 2, C for Rnd 3 and A for Rnd 4.
Motif 4 (Make 4)
Work same as Motif 1, using A for Rnd 1, C for Rnd 2, B for Rnd 3 and A for Rnd 4.
Finishing
Sew motifs tog following diagram. Note: Where whole motifs are shown, the motif directly behind it is not shown, but is the same motif. Dotted lines show where motifs are folded so that half is on one side and half is on the other. Fold top motifs down in half to RS as in photo.
Hanging Loop: With crochet hook, join 1 strand each of A and C in back top edge of stocking with a sl st. Make a chain 3” long. Join with a sl st next to beg of ch. Fasten off.
Tassel: Wrap A multiple times around a 3 1/2” long piece of cardboard. Tie strands tog at one end with a 10” long strand of A. Cut one edge to free wrapped strands. Wrap tassel ¾” down from top with a second 10” long strand of A and tie securely, drawing ends into center of tassel. Trim ends to even off if necessary. Tie tassel to point of top motif as in photo. Note: If desired, tassels may be fastened to both sides of top motifs.
Magi B
Skill level: Easy
Technique: Knit
Size
Approximately 7” wide x 18” high (including edging)
Materials
2 Balls Berroco Comfort (50 grs), #9703 Barley (MC) and 1 ball each #9760 Beet Root (A) and #9762 Spruce (B)
Straight knitting needles, size 8 (5.00 mm) OR SIZE TO OBTAIN GAUGE
Crochet hook, size 5.00 mm (H)
Tapestry needle
Gauge
20 sts = 4”; 27 rows = 4” in Seed St
TO SAVE TIME, TAKE TIME TO CHECK GAUGE
Seed Stitch (odd number of sts)
Row 1: K1, * p1, k1, rep from * across.
Rep this row for Seed St.
Back
With straight needles, using MC, cast on 49 sts. Work even in Seed St for 2 rows, end on WS. Inc 1 st each end of next row, then every other row twice, working incs in Seed St – 55 sts. Work even in Seed St until piece measures 5 1/4”, end on WS. Dec 1 st at end of next row, then at end of every RS row twice, end on RS – 52 sts. Bind off 25 sts at beg of the next row, work to end – 27 sts. Work even until piece measures 18” from beg, end on WS. Bind off.
Front
Work same as back.
Finishing
Using tapestry needle and A and B, embroider front as in photo, working in cross st. We suggest that you enlarge the photo and work cross sts over bumps of Seed St as in counted cross st. Note: Your embroidery does not need to be exactly like ours. Have fun with it and make yours an original. Hold back and front tog with WS facing each other.
Edging: Using crochet hook, join B in top edge with a sl st, work in sc around side and lower edges of stocking, working through double thickness and joining pieces tog. Turn.
Row 2: Ch 1, sc in first sc, * ch 2, skip 2 sc’s, sc in next sc, rep from * around. Fasten off. Turn. Join A with a sl st in last sc worked, sc in same sc, ch 1, sc in next ch-2 space, * ch 2, sc in next ch-2 space, rep from * around, end ch 1, sc in last sc. Fasten off.
Top Edging: With RS facing, using crochet hook, join B at side edge of top with a sl st.
Rnd 1: Ch 1, sc in first st of stocking, * ch 2, skip 2 sts of stocking, sc in next st of stocking, rep from * around, end ch 2, join with a sl st in beg ch-1. DO NOT turn.
Rnd 2: Ch 3, * 4 dc’s in next ch-2 space, rep from * around, join with a sl st in top of beg ch-3. DO NOT turn.
Rnd 3: Ch 1, sc in each dc around, join with a sl st in beg ch-1. Fasten off. DO NOT turn.
Rnd 4: Join A with a sl st in top of beg ch-1 of previous rnd, ch 1. Working from left to right in Reverse Sc, work 1 sc in every other sc around. Join with a sl st in beg ch-1. Fasten off.
Twisted Cord: Cut Seven 70” long strands of A. Put strands tog and fold in half. Tie ends in a knot. Holding the knot in your hand, slip the loop over a hook and pull tight. Slip a pencil through the knotted end and twist until cord is so tight that it can’t be twisted further and starts to double back on itself. Put 1 finger in center of cord and carefully fold in half, letting 2 ends of cord twist tog. Starting at back of stocking, weave cord in and out of Rnd 1 of Top Edging, then tie ends in a knot as in photo. Trim ends, leaving 2” free for tassel.
Magi C
Skill level: Intermediate
Technique: Knit
Size
Approximately 6” across x 18” high
Materials
2 Balls Berroco Comfort (50 grs), #9760 Beet Root (MC) and 1 ball #9703 Barley (CC)
Straight knitting needles, size 8 (5.00 mm) OR SIZE TO OBTAIN GAUGE
Cable needle (cn)
Crochet hook, size 5.00 mm (H)
1 St marker
Gauge
20 sts = 4”; 27 rows = 4” in Moss St
TO SAVE TIME, TAKE TIME TO CHECK GAUGE
Stitch Glossary
CB4
Sl 2 sts to cn and hold in BACK, k2, k2 from cn
CF4
Sl 2 sts to cn and hold in FRONT, k2, k2 from cn
Moss Stitch (even number of sts)
Row 1 (RS): * K1, p1, rep from * across.
Row 2: K the k sts and p the p sts as they face you.
Row 3: Rep Row 2.
Row 4: Rep Row 1.
Rep these 4 rows for Moss St.
Cable Pattern (Worked over 40 sts)
Note: Due to the nature of this pat, the number of sts will vary from row to row. The number of sts given after a row indicates the number of sts you will have after completing that row.
Row 1 (RS): P3, k1, p1, k4, p1, k1, p3, k1, p1, k8, p1, k1, p3, k1, p1, k4, p1, k1, p3.
Row 2: K1, (k, p, k) all in next st, k1, p1, k1, p4, k1, p1, k1, (k, p, k) all in next st, k1, p1, k1, p8, k1, p1, k1, (k, p, k) all in next st, k1, p1, k1, p4, k1, p1, k1, (k, p, k) all in next st, k1 – 48 sts.
Row 3: P5, k1, p1, CB4, p1, k1, p5, k1, p1, CB4, CF4, p1, k1, p5, k1, p1, CF4, p1, k1, p5.
Row 4: K1, p3 tog, k1, p1, k1, p4, k1, p1, k1, p3 tog, k1, p1, k1, p8, k1, p1, k1, p3 tog, k1, p1, k1, p4, k1, p1, k1, p3 tog, k1 – 40 sts.
Row 5: Rep Row 1.
Row 6: K3, p1, k1, p4, k1, p1, k3, p1, k1, p8, k1, p1, k3, p1, k1, p4, k1, p1, k3.
Row 7: P3, k1, p1, CB4, p1, k1, p3, k1, p1, CF4, CB4, p1, k1, p3, k1, p1, CF4, p1, k1, p3.
Row 8: K1, (k, p, k) all in next st, k1, p1, k1, p4, k1, p1, k1, (k, p, k) all in next st, k1, p1, k1, p8, k1, p1, k1, (k, p, k) all in next st, k1, p1, k1, p4, k1, p1, k1, (k, p, k) all in next st, k1 – 48 sts.
Row 9: P5, k1, p1, k4, p1, k1, p5, k1, p1, k8, p1, k1, p5, k1, p1, k4, p1, k1, p5.
Row 10: K1, p3 tog, k1, p1, k1, p4, k1, p1, k1, p3 tog, k1, p1, k1, p8, k1, p1, k1, p3 tog, k1, p1, k1, p4, k1, p1, k1, p3 tog, k1 – 40 sts.
Row 11: P3, k1, p1, CB4, p1, k1, p3, k1, p1, CB4, CF4, p1, k1, p3, k1, p1, CF4, p1, k1, p3.
Row 12: K3, p1, k1, p4, k1, p1, k3, p1, k1, p8, k1, p1, k3, p1, k1, p4, k1, p1, k3.
Row 13: Rep Row 1.
Row 14: Rep Row 2 – 48 sts.
Row 15: P5, k1, p1, CB4, p1, k1, p5, k1, p1, CF4, CB4, p1, k1, p5, k1, p1, CF4, p1, k1, p5.
Row 16: Rep Row 4 – 40 sts.
Row 17: Rep Row 1.
Row 18: Rep Row 6.
Row 19: Rep Row 11.
Row 20: Rep Row 8 – 48 sts.
Row 21: Rep Row 9.
Row 22: Rep Row 10 – 40 sts.
Row 23: Rep Row 7.
Row 24: Rep Row 12.
Rep these 24 rows for Cable Pat.
Back
With straight needles, using MC, cast on 63 sts.
Establish Pat St: Row 1 (RS): Omitting first p3, work Row 1 of Cable Pat over 37 sts, place marker, work Row 1 of Moss St over 26 sts.
Row 2: Work Row 2 of Moss St to marker, work Row 2 of Cable Pat to end, omitting k1, (k, p, k) all in next st, k1 at end. Work in pats as established, inc 1 st each end of next row, then every RS row twice, working incs into pats as sts become available – 69 sts. Work even until piece measures 5 1/4” from beg, end on WS. Dec 1 st at end of next row, then at end of every RS row twice, end on RS – 66 sts.
Next Row (WS): Bind off 26 sts, drop marker, work in Cable Pat to end – 40 sts. Work even in Cable Pat until piece measures 12” above bound-off sts, end on WS. Bind off.
Front
Work same as back, reversing placement of pat sts. Work Moss st over first 26 sts, place marker, then work Cable Pat over last 37 sts. When piece measures 6” from beg, end on WS. Bind off 29 sts at beg of next row, drop marker, then work in Cable Pat to end – 40 sts. Complete same as back.
Finishing
Holding back and front tog with WS facing each other, beg at top edge, using crochet hook and MC, work in sc around stocking, working through double thickness and joining pieces tog.
Hanging Loop: With crochet hook, join 2 strands of MC held tog in back of top edge with a sl st. Make a chain 3” long, join with a sl st next to beg of ch. Fasten off. With CC, make eleven 2” pompons and sew around top edge of stocking as in photo.
- Yarns Used:Berroco Comfort®
- Designer:Berroco Design Team
- Skill Level:Intermediate
- Craft:Knit
- Project Type:Holiday

Yarn Used

Berroco Comfort®