Sideways Cardigan
Sideways Cardigan
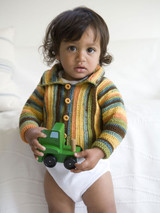
Much like patterned sock yarn, the yarn used for this easy cardigan works up in stripes and dots, doing all the color changes for you. While working from cuff to cuff in the simplest of crochet stitches, it’s fun to see the patterns emerge and wonder what color will be next.
Sizes
3 (6, 9, 12, 18, 24) months
Finished Measurements
19 (21, 22, 23, 24, 26)"
Materials
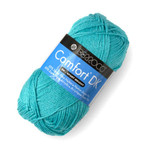
3 (3, 3, 4, 4, 4) Balls Berroco Comfort DK (50 grs), #2856 Balance Beam
One crochet hook size US F/5 (3.75 mm)
Change hook size if necessary to obtain correct gauge.
Five 5/8" buttons
Gauge
22 sts and 26 rows = 4" (10 cm) in Ridged Single Crochet (Ridged sc)
Stitch Pattern
Ridged Single Crochet (any number of sts + 1 ch; 2-row repeat)
Set-Up Row (WS): Sc in second ch from hook and in each ch to end, turn.
Row 1: Ch 1, *sc-tbl in each sc to end, turn.
Row 2: Ch 1, *sc-tfl in each sc to end, turn.
Repeat Rows 1 and 2 for Ridged sc.
Note
Piece is worked sideways from Left Sleeve to Right Sleeve.
Left Sleeve
Ch 29 (29, 35, 35, 39, 39). Begin Ridged sc; work even for 8 rows—28 (28, 34, 34, 38, 38) sc.
Shape Sleeve
Increase Row (RS): Increase 1 st each side this row, then every other row 7 (10, 8, 10, 9, 10) times, as follows: Work 2 sc in the same st, work to last st, work 2 sc in the same st—44 (50, 52, 56, 58, 60) sc. Work even until piece measures 6½" from the beginning, ending with a WS row. Take note of number of rows worked after last Increase Row.
Body
Next Row (RS): Ch 31 (31, 35, 35, 37, 37), turn, work sc in second ch from hook and in ch, then work in pattern as established to end, ch 31 (31, 35, 35, 37, 37), turn, work sc in second ch from hook and in each ch, then work in pattern as established to end—104 (110, 120, 124, 130, 132) sc. Work even until piece measures 2½ (3, 3, 3¼, 3¼, 3¾)" from beginning of Body, ending with a WS row.
Shape Back Neck
Next Row (RS): Work 52 (55, 60, 62, 65, 66) sts, turn. Working on Back sts only, work even until Back neck measures 4½ (4½, 5, 5, 5½, 5½)", ending with a RS row. Cut yarn. left fRont
Shape Neck
Next Row (RS): With RS facing, rejoin yarn to Front neck edge, slip st into first 4 sts of Left Front, work to end. Slip 3 sts at Front neck edge every RS row once, 2 sts once, then 1 st once—42 (45, 50, 52, 55, 56) sc remain. Work even until piece measures 4¾ (5¼, 5½, 5¾, 6, 6½)" from beginning of Body, ending with a WS row. Place markers for 5 buttonholes, the first 2 sts from neck edge, the last 2 sts from the bottom edge, and 3 more evenly spaced between.
Buttonhole Row (RS): Work even, working ch 2 and sk 2 at each marker. Work even for 1 row, working 2 sc in each ch-2 sp. Fasten off.
Right Front
Ch 43 (46, 51, 53, 56, 57). Begin Ridged sc; work even until piece measures 1½ (1½, 1¾, 1¾, 2, 2)", ending with a WS row—42 (45, 50, 52, 55, 56) sc.
Shape Neck
Increase Row 1 (RS): Ch 2, turn, work sc in second ch from hook, work to end.
Increase Row 2 (WS): Work to end, ch 3, turn, work sc in second and third ch from hook, work to end.
Increase Row 3 (WS): Work to end, ch 4, turn, work sc in second, third, and fourth ch from hook, work to end.
Increase Row 4 (WS): Work to end, ch 5, turn, work sc in second, third, fourth, and fifth ch from hook, work to end—52 (55, 60, 62, 65, 66).
Join front and Back (WS): Work to end of Front, work across Back sts to end—104 (110, 120, 124, 130, 132) sts. Work even until piece measures 9½ (10½, 11, 11½, 12, 13)" from beginning of Body, ending with a WS row.
Right Sleeve
Next Row (RS): Slip st into first 30 (30, 34, 34, 36, 36) sts, work next 44 (50, 52, 56, 58, 60) sts, turn—44 (50, 52, 56, 58, 60) sts remain. Work even for number of rows worked on Left Sleeve after last Increase Row.
Shape Sleeve
Decrease Row: Decrease 2 st at beginning and end of this row, then every other row 7 (10, 8, 10, 9, 10) times, as follows: Sc2tog, work to last 2 sts, sc2tog—28 (28, 34, 34, 38, 38) sc remain. Work even until piece measures same as for Left Sleeve. Fasten off.
Finishing
Collar: With WS of Left Front facing, beginning ¼" in from Left Front edge, work 62 (68, 75, 79, 86, 94) sc evenly along Left Front neck, Back neck, then Right Front neck, ending ¼" before Right Front neck edge. Begin Ridged sc; work even for 3". Fasten off. Sew side and Sleeve seams. Sew buttons to Right Front opposite buttonholes.
- Yarns Used:Berroco Comfort® DK Print
- Yarns Used:Berroco Comfort® DK
- Designer:Berroco Design Team
- Skill Level:Intermediate
- Craft:Crochet
- Project Type:Baby/Children


